

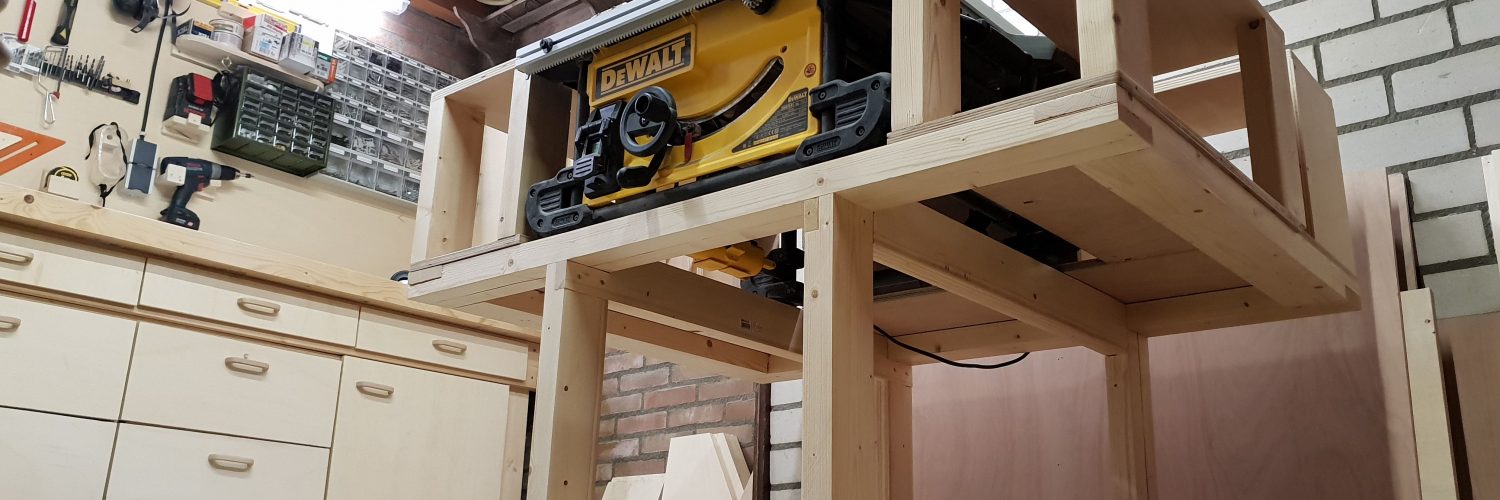
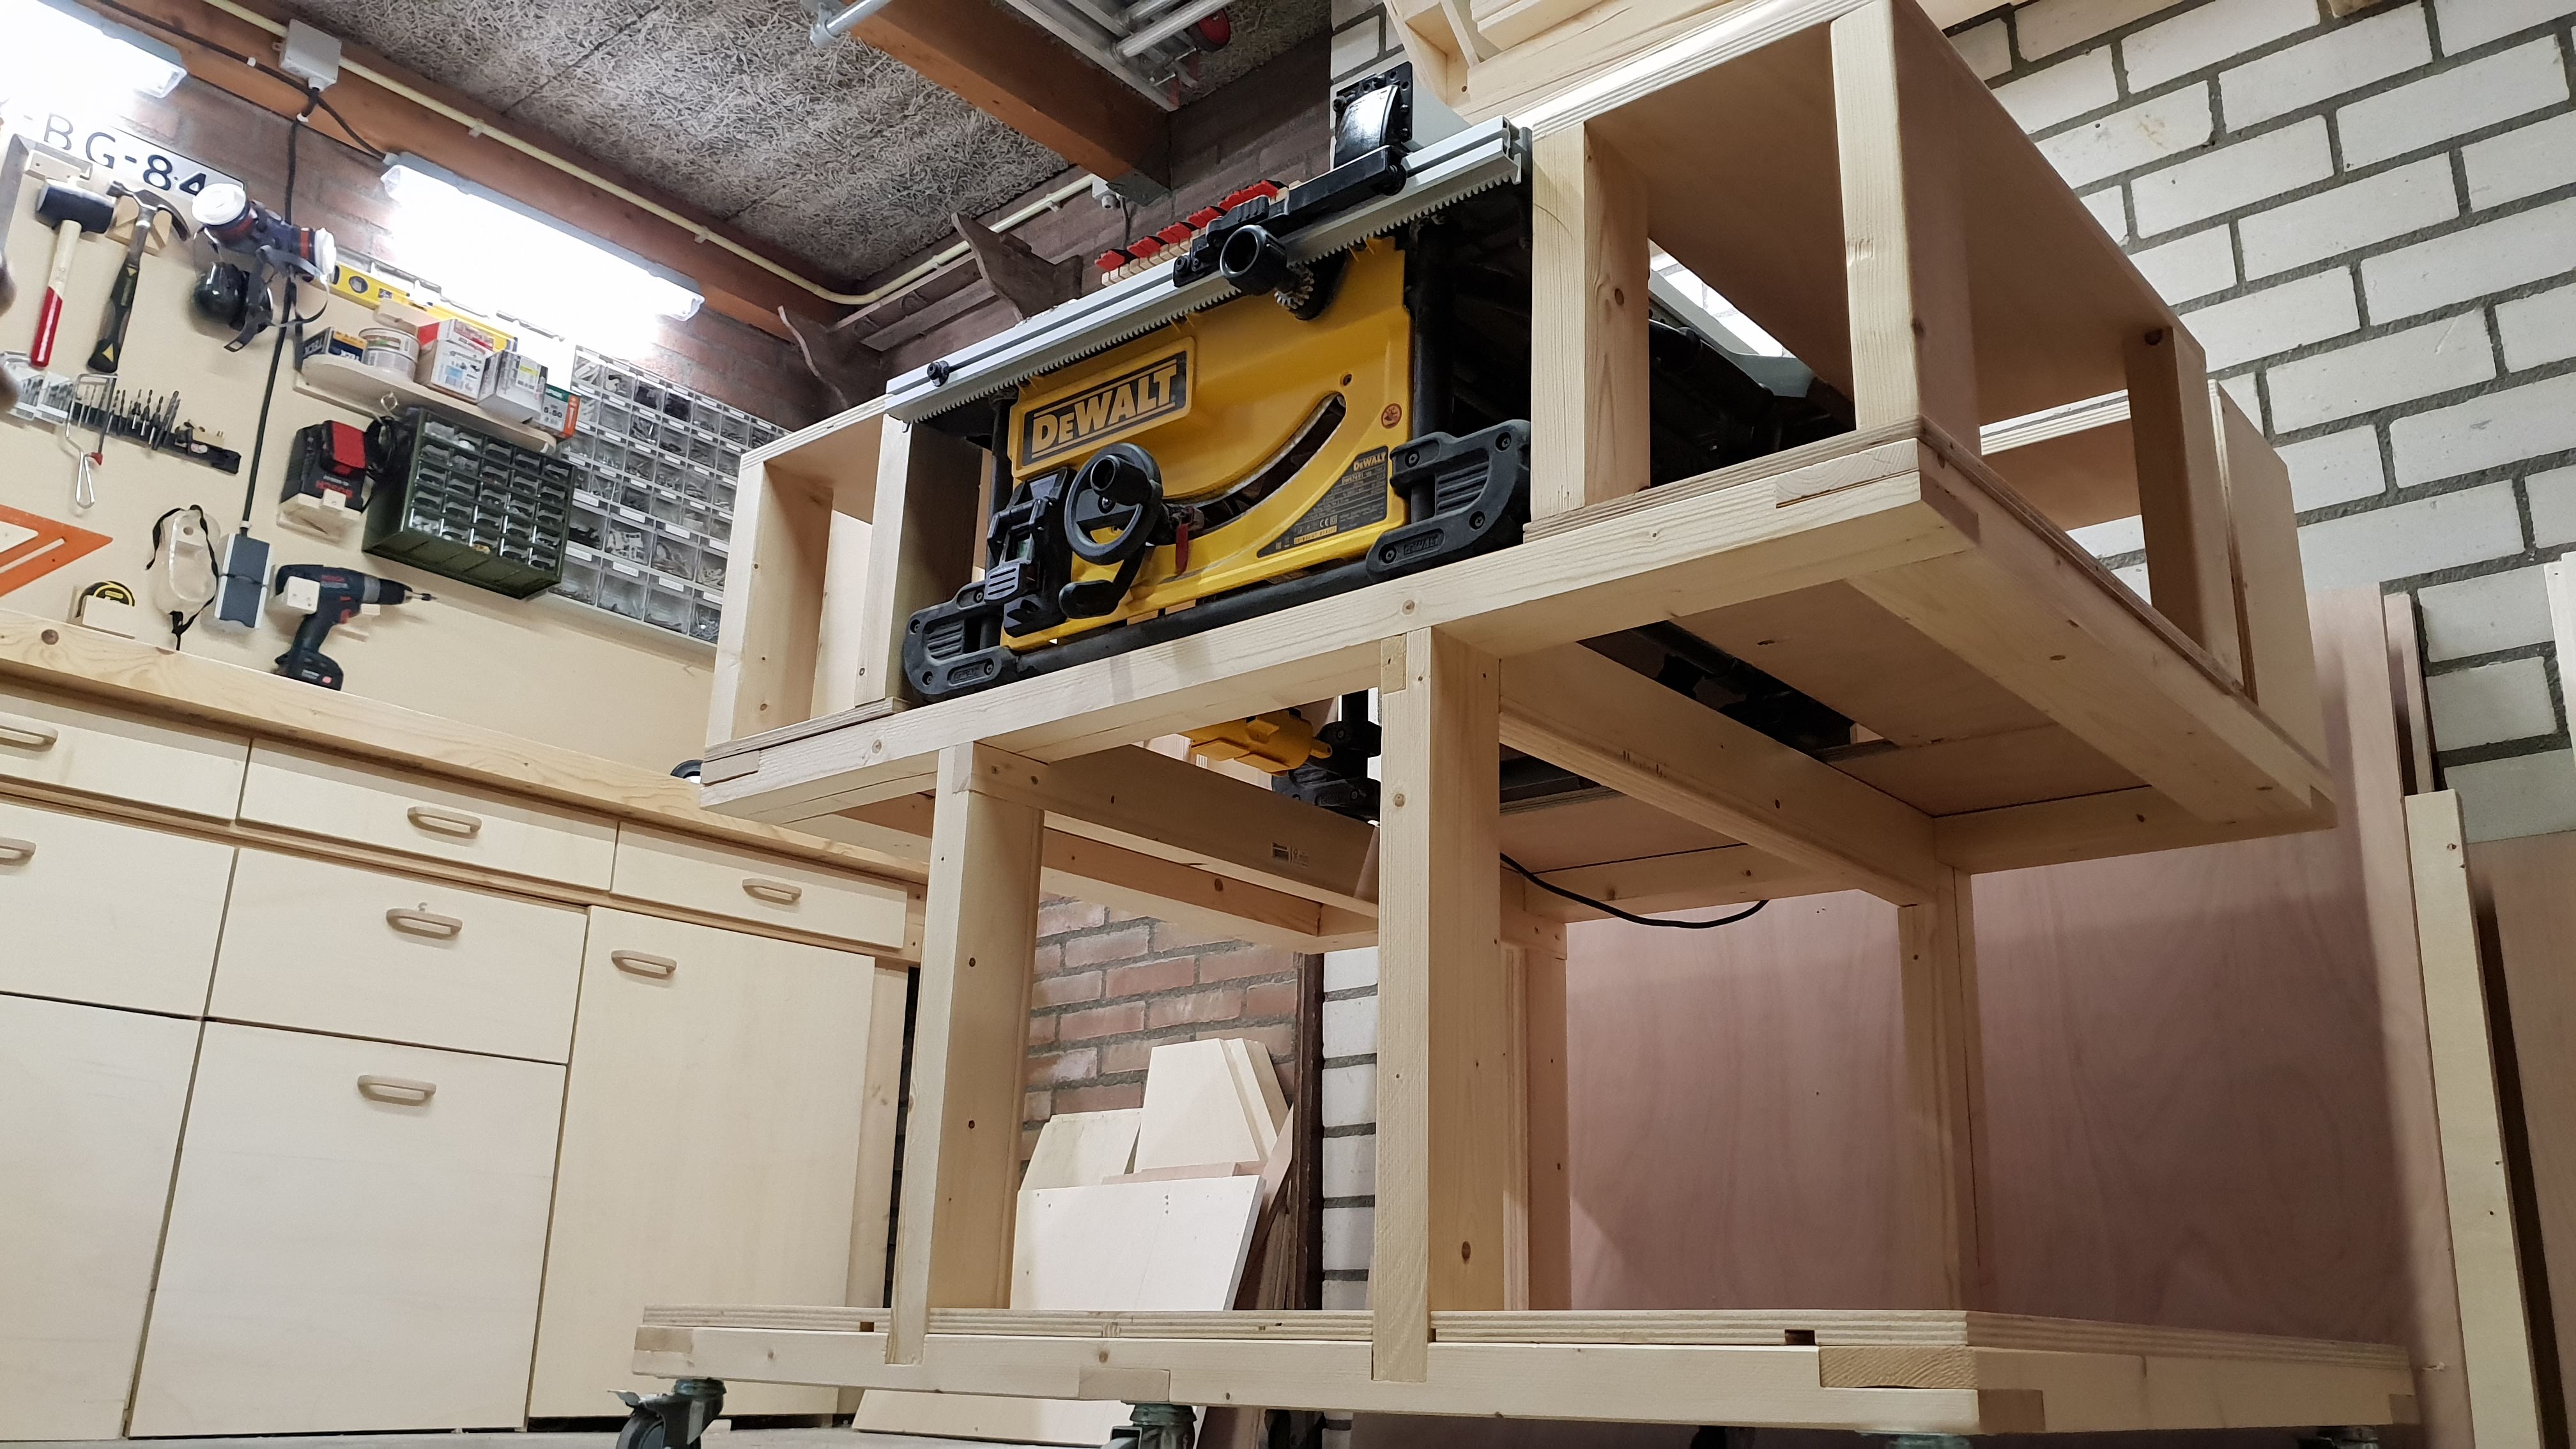
The idea was to build a mobile workstation for my DeWALT DWE7491 table saw. I wanted a way to move my saw around, work at a comfortable height and combine that with more surface to work on in my shop.
Design
It all started as many of my projects do, with making a SketchUp 3D model of what I want to build. For me, this is the easiest way to determine what I want to build exactly and what material I need. Below is a screenshot of what I ended up making, a download of the file is available at the bottom of the article.
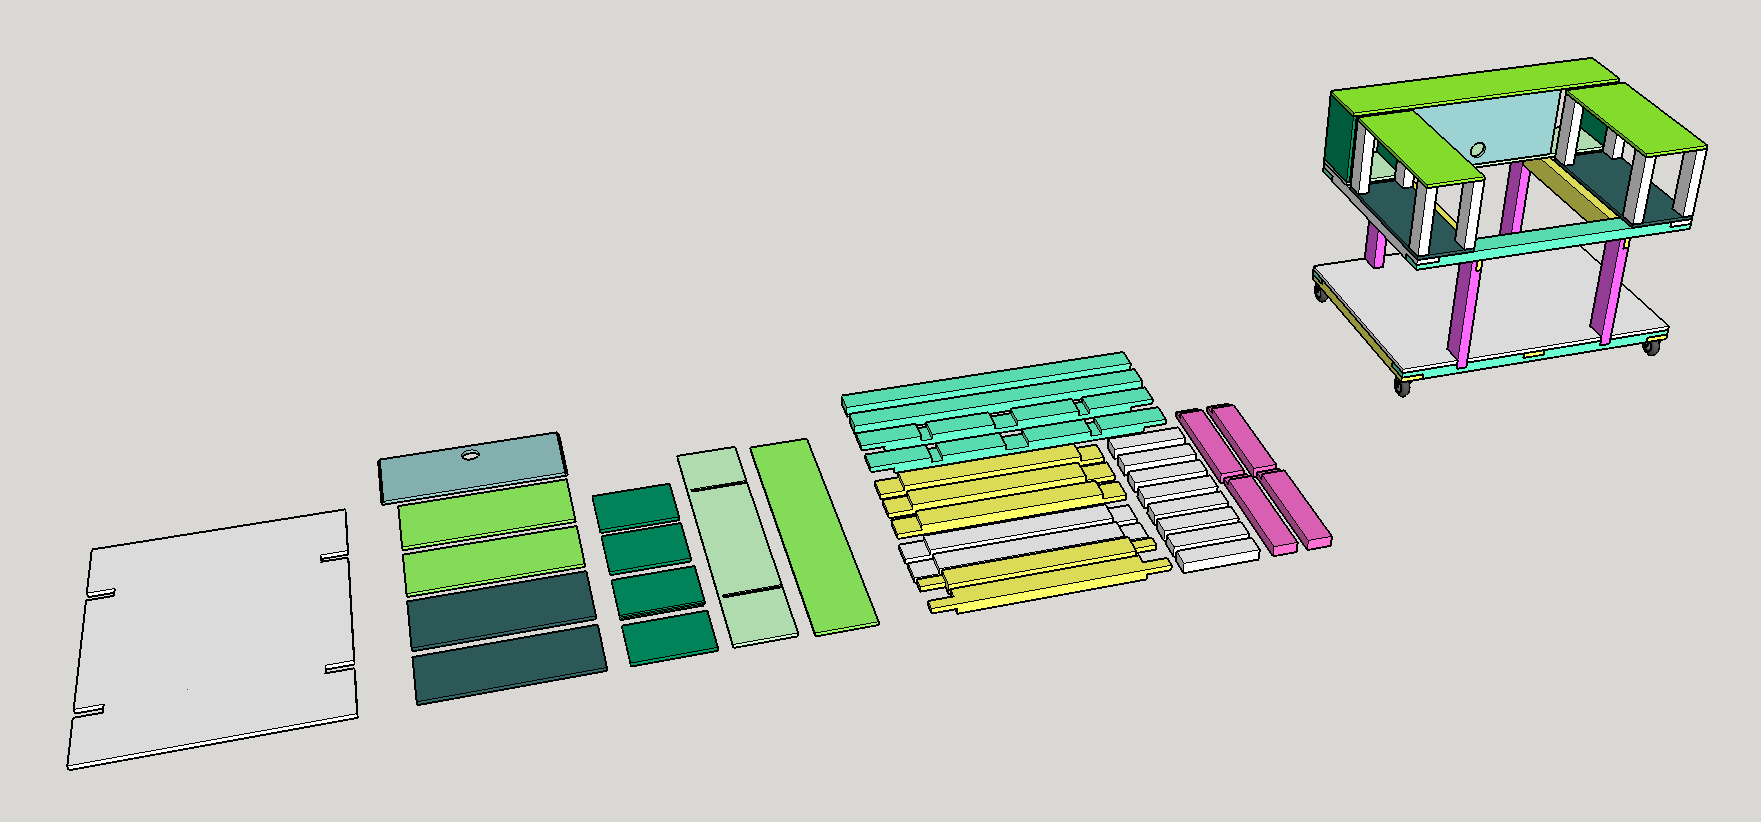
The structure I came up with leaves all sides of the saw easily accessible. In the open space, I can add boxes to store things in and that can be pulled out when I need access. The back section is made with plywood so I also have some vertical surface when I need to clamp material vertically. On the bottom, I want to create a dust collection solution that moves with the saw plus some additional space for heavier things such as my welder.
I intend to expand on this design as I start using it so I kept the basis simple. From my experience, the final build evolves by fulfilling needs that become clear once it’s in use. Over-building the first version is easily done. In my case, it usually means that I end up pulling it apart and rebuilding part of it. This is also the reason I try not to use glue for shop projects.
Build
Frame
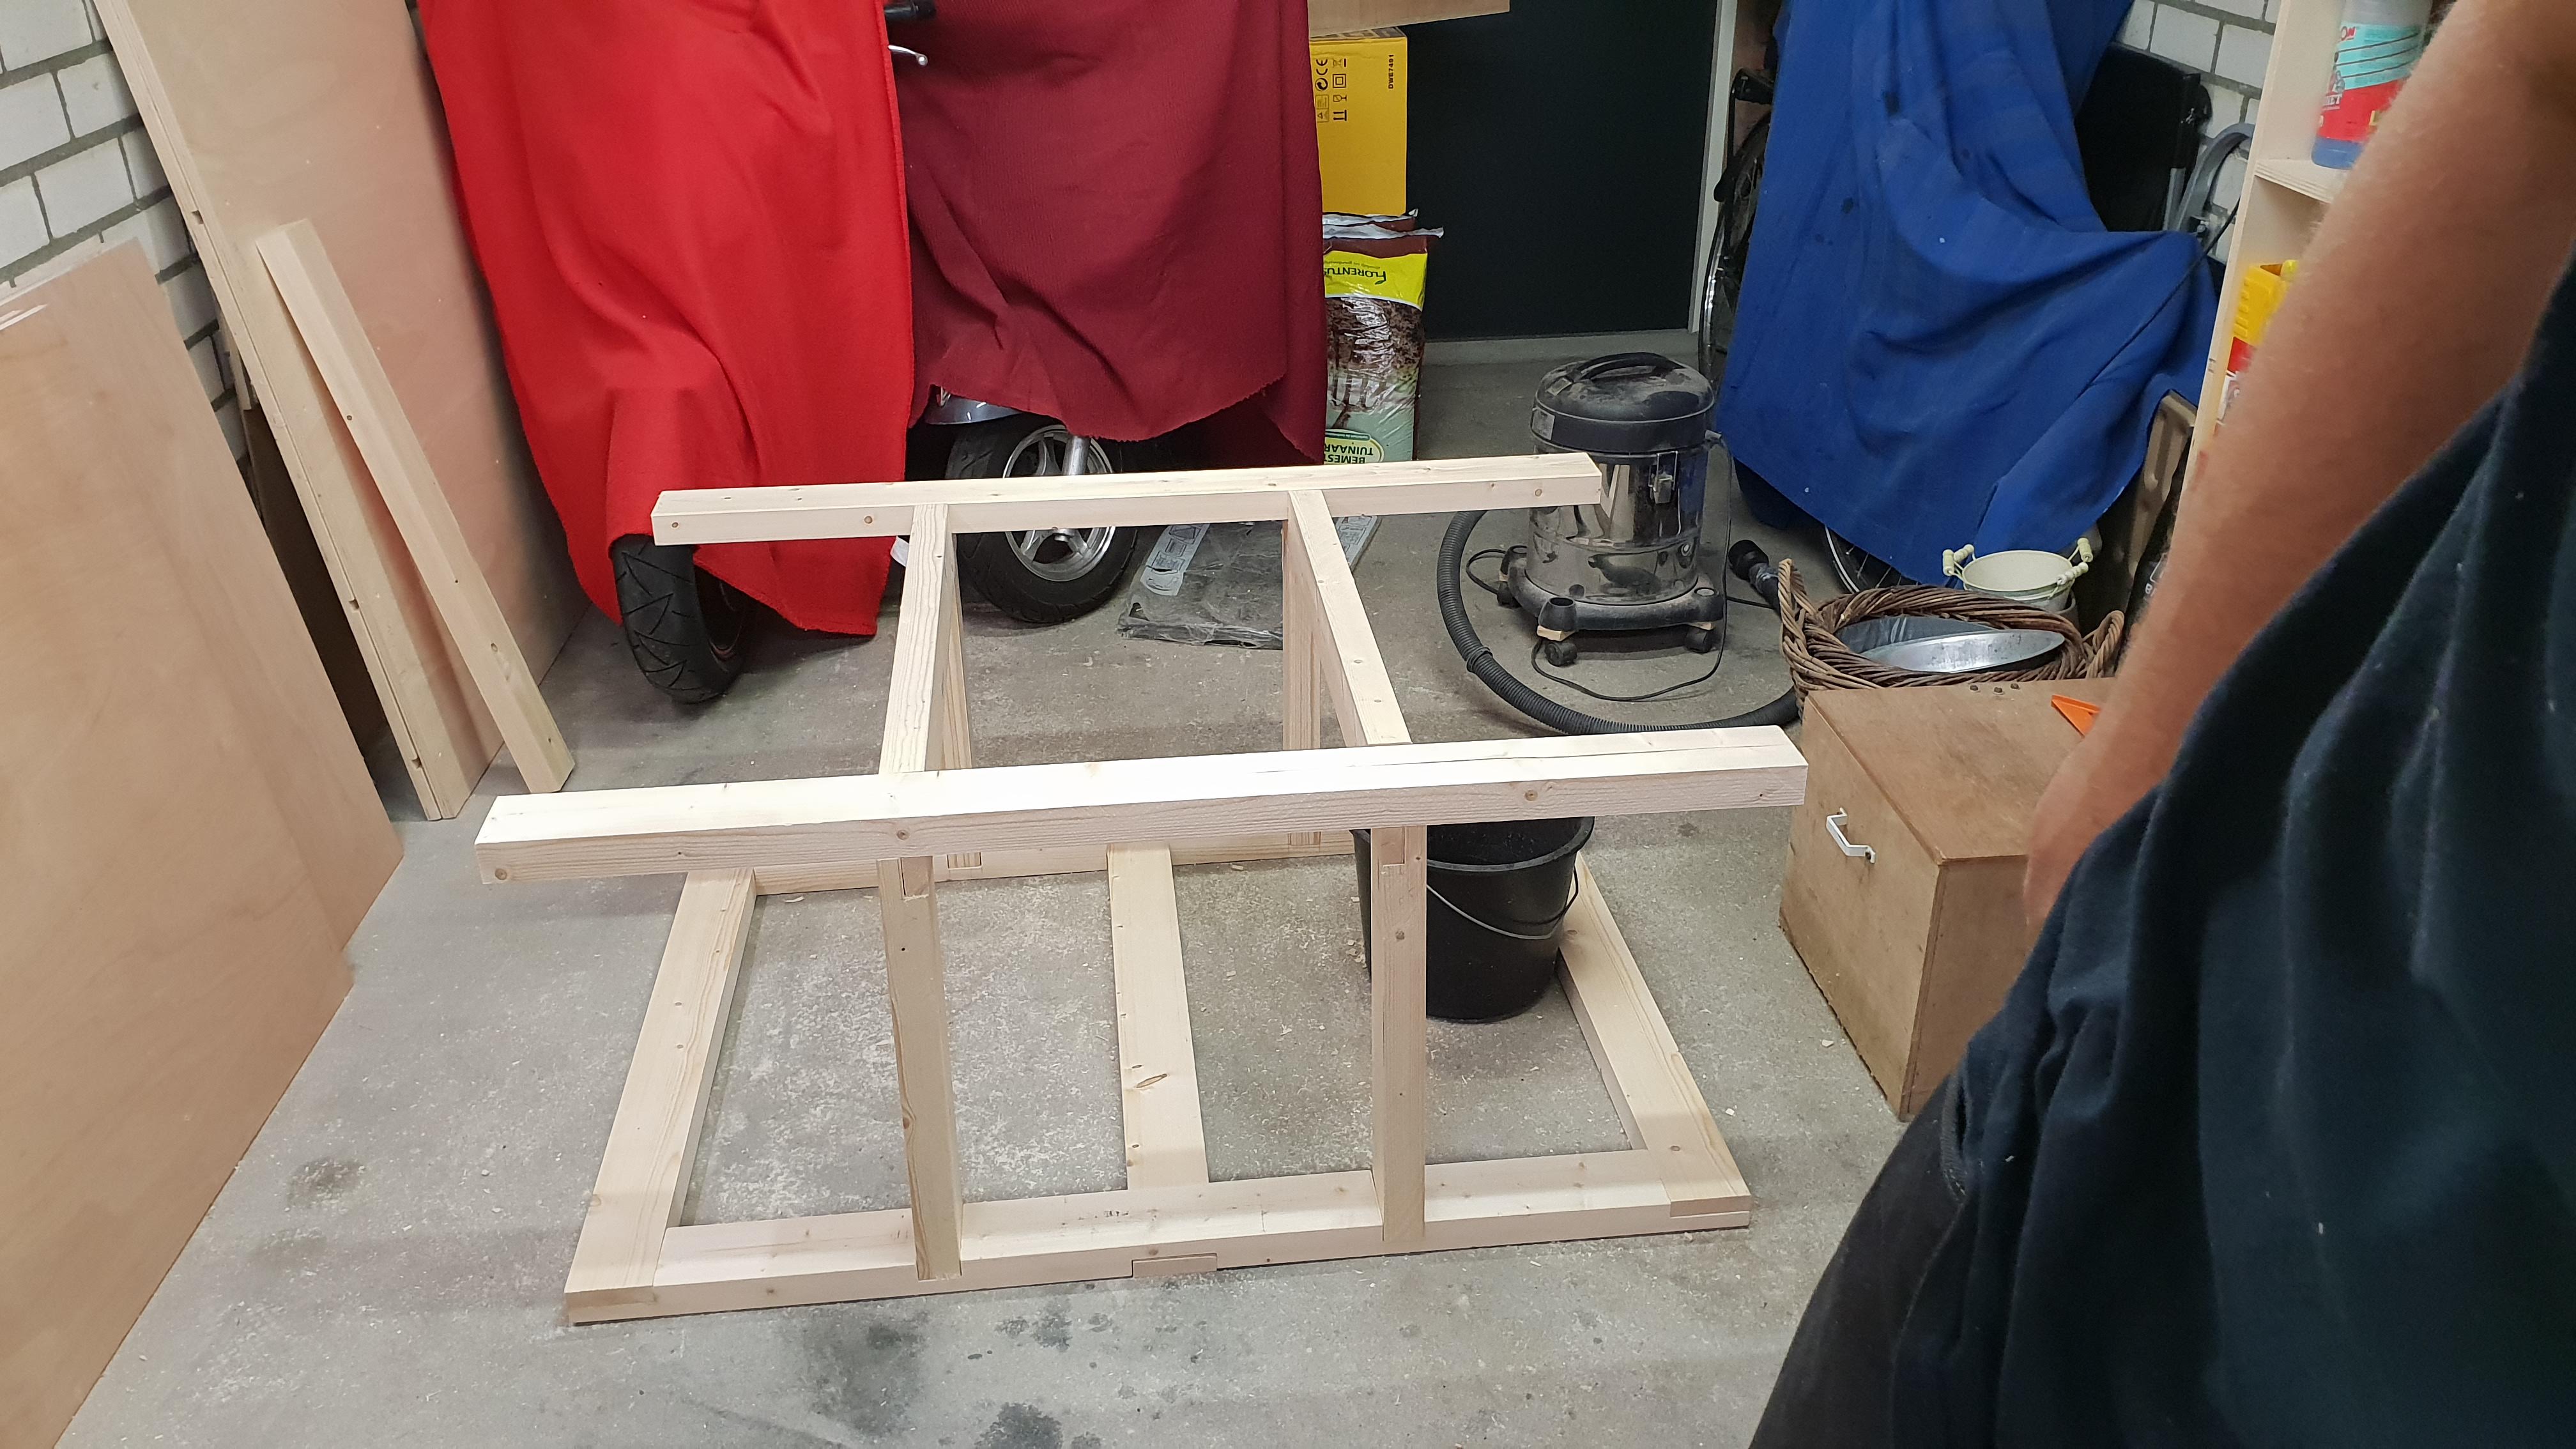
I start by ripping down the wood that I need for the frame. I’m not cutting everything to size yet because I want to cut the remaining parts to size in place. This is mostly because I’m dealing with the odd dimensions of the saw. The frame will be assembled with half-lap joints for strength and because I don’t have to use glue for this joint to be strong. For the top section of the frame, I recessed a part of the front and back legs to form the joint you see below. I did this to maintain the strength of the top frame as much as possible. It allowed me to not have legs on the outside of the workbench and still have a strong enough frame that it wouldn’t bend under pressure from above. Which worked great!

Cabinets
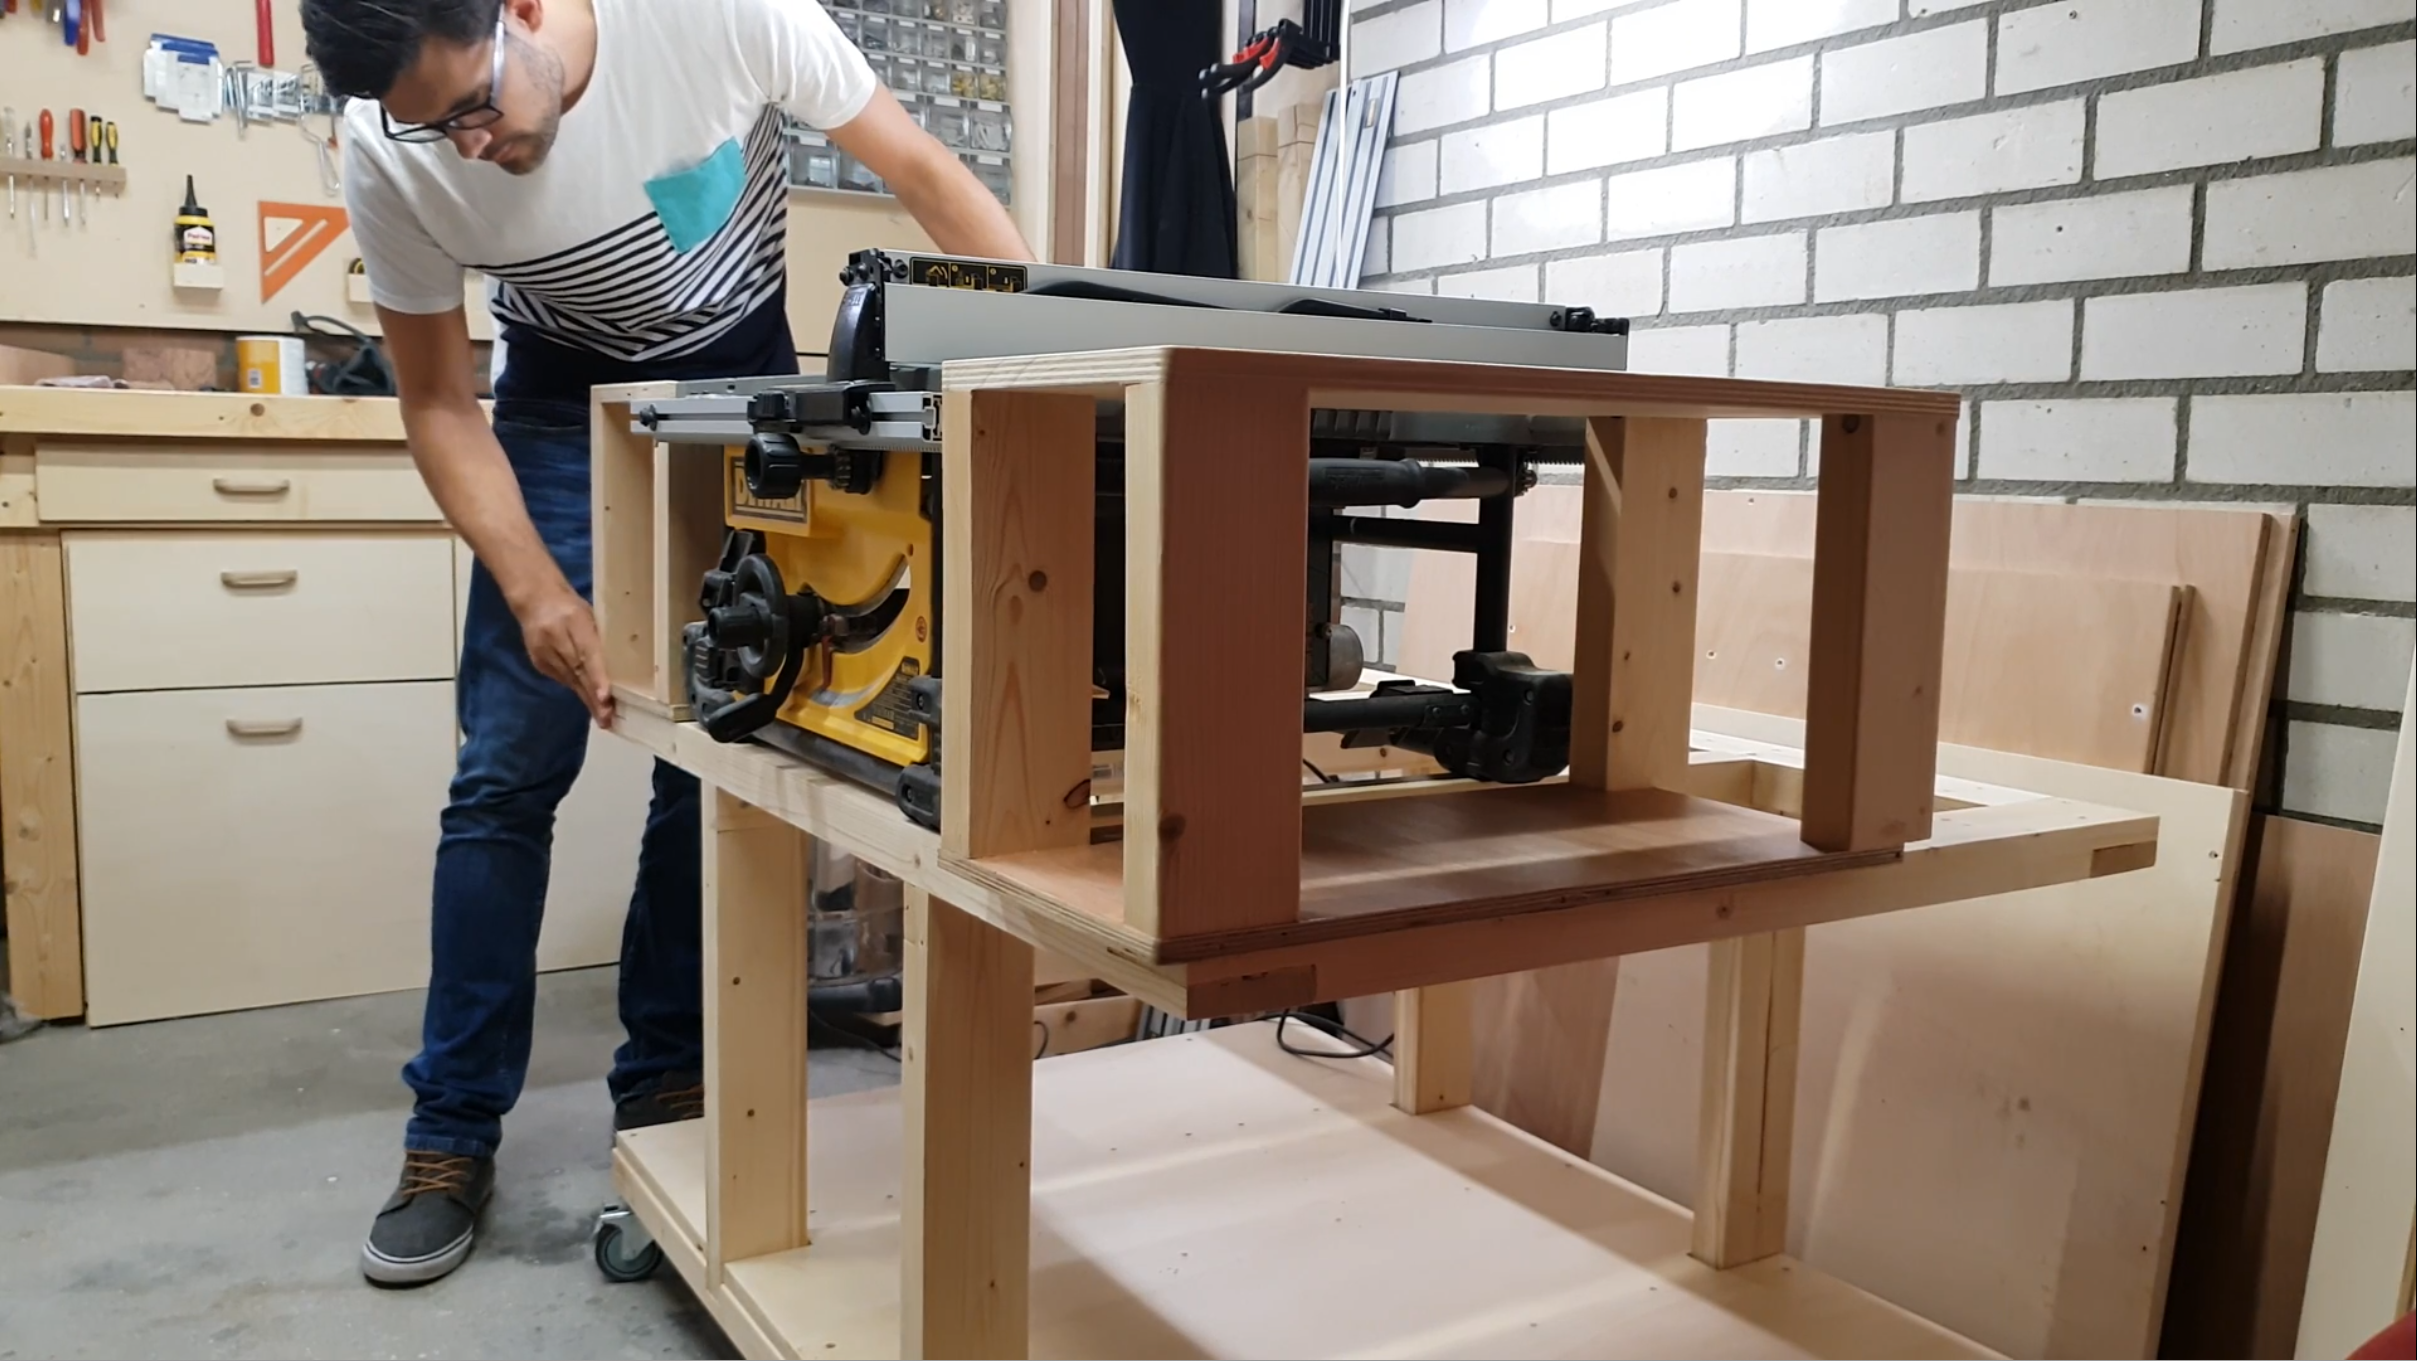
Once the frame was assembled I first fit the floor around the legs and attached the wheels so it could be moved around. At that point, I could start working around the saw to fit the remaining parts. The cabinets on the side are made up out of a plywood top and bottom with 2 by 4 sides. The rear cabinet is made with just plywood to close it off more to dust coming off the saw.
The most challenging part was to fit everything tight around the saw without restricting the movement of the fence and blocking off access to the sides of the saw. In the end, I had to make some concessions in that area despite my best efforts. The quick-release for both the fence and the riving knife can only be accessed by lifting the saw up. Hopefully I can come up with a better solution for this in the future but for now, it works well enough.
Result
The first version already has had quite some use and I’m happy with it so far. The biggest downside for me is that I don’t have a decent dust collection so the bottom is covered in dust after cutting some wood. I intend to solve this by improving the dust collection and I want to look at ways to further direct the dust to one spot. Besides the dust, the workbench works great.
Additions
The first addition I made almost directly after I finished the video was adding a drawer with longer cut-offs. I already had the box but it was sitting on my workbench catching dust so it was a quick win to make it into a drawer.

Downloads & Links
If you want to build something similar I’ve linked my 3D model below as a download. It’s in metrics since I have no clue how to use imperial. That’s Europe for you, sorry guys.
SketchUp 3D-model (Metric)
SketchUp 3D-model (Imperial) *Special thanks to John Grieda for converting the Metric file and sending it over to me to share with the rest of the world!
Measured parts (metric)
Imperial cut list with images
Instagram 1 | 2 | 3 | 4 | 5
Hope this post has inspired you to make something!
And don’t forget to follow your excitement 🙂
Hi I like your table that is what I have to make for my saw. I downloaded the plans but I can’t open them on any of my devices. Don’t know why. Thanks
Hi Martin, the file can only be opened by SketchUp 2017 or newer. You can download the software for free here: https://www.sketchup.com/download/make
Let me know if you manage to open it.
Great build! Trying to design my garage workshop and it looks like this may be just right. I am unable to grab the Lima for sketchup and Instagram. Love to get the plans. THANKS
Hi Brian, Thanks for your comment. Hopefully you can get the links from this comment.
Sketchup plan: https://www.cornerfieldshop.com/wp-content/uploads/files/MobileWorkstation_v2.skp
Instagram: 1 – https://www.instagram.com/p/BnlyiW_CwJK/ 2 – https://www.instagram.com/p/Bnl9XgUCobY/ 3 – https://www.instagram.com/p/BnnxR3_CgKv/ 4 – https://www.instagram.com/p/Boqyip0BCDZ/ 5 – https://www.instagram.com/p/BtePzaDINPZ/
Hello very interested in your table saw workstation,having trouble getting the plans I got on sketch up like you suggested to another viewer but could not figure out how to get them could you email me a simple cut list and plan if not to much trouble I understand if you can’t thanks again,email to jimmy.grossini@yahoo.com
Hi Jimmy, happy to help you! I will take a look at what I can pull together. Do you want imperial or metric measurements?
Also, could you help me by sending some screenshots/details on the file not opening? I would love to solve this issue once and for all.
Thanks! I will be in touch as soon as possible. Things are a little hectic at the moment… To be continued!
Thanks for getting back with me,I would love the plans in imperial if not a problem and I will try and send a screen shot of the file that won’t open,I do appreciate you helping me out,
Hi, great job¡¡, I’m going to set up this work table for my dewalt 745 and I already have the Sketchup model, but I can not find the cut list, can you help me with this?
I would also like to know the type of wood you have used.
Thank you¡¡
Hi Diego,
Thanks for your message!
The cut list is in a layer of the 3d model. It’s not a list as in measurements listed but all the pieces are shown with dimensions in the model. Hope that helps.
The wood I used is just cheap 2 by 4’s from Pine.
Have fun building your version!
Hello,
Can you send me or publish a drawing like in pdf format
Even tha basic. Easufements will help
Very nice idea .simple and strong and looks asowm
Kind regards
Nadav
Ik dacht erover om ook zo iets te bouwen maar dan ook met een freesmachine ingebouwd. Ik heb een freestafel van Kreg met Triton frees erin maar dit werkt niet zo goed als op YouTube, zit er bij jou ook zo iets in de pijplijn
Bedankt voor je berichtje! Dit staat wel op de planning ja. Ik ga de liftfrees van Matthias Wandel maken aan de rechterkant van mijn zaag. Althans, dat ga ik proberen. Wanneer precies weet ik nog niet maar als je abonnee bent op YouTube zie je het vanzelf voorbij komen :-).
Kijk, dat is top! Op zo’n combi zit ik ook te wachten! Ben benieuwd hoe je dit gaat aanpakken en wacht met smart af 🙂
de zaaglijst kan ik niet terugvinden van je tafel , mocht je mij deze ook willen toesturen, heel graag
Nicely done. I see the SketchUp drawing but I cannot seem to locate any of the dimensions. They don’t seem to show up in the program. I must be missing something.
Just found the cutlist. Thanks.
Great job , would like the plans
Hi Tom, the files are available for download at the bottom of the article.
I really enjoyed the way you build the saw table.
Thanks Victor!
Fantastic work on this, Rico. I’ve watched these 3 times now building up my motivation to build a bench “inspired” by your design. I was hoping to make it approximately 105cm x 170cm just to maximize work surface in the space I have. My thought was to put the saw in the 105cm side giving me a lot of outfeed/work surface. I was thinking I’d just leave the left side of the saw open, and enclosing the right side for a router lift (love your fence design there). Would I regret that? How much would you miss the extra support on the left side? Does enclosing that side also aid with dust collection? Thanks!!
Thank you Paul! I think you probably won’t regret that. It all has to do with your space. If the station works best for you without a cabinet on the left then you should leave it off.
The question of support is answered as soon as you put it together. Because that depends on where the bulk of the weight is of your saw (motor mostly), the size of the timber you use, etc. I would leave the option to add additional support if you can. Should you need it, that it’s possible.
The more you can close the saw off the better the dust extraction. It amazes me how poorly these construction type saws are at collecting dust. I would suggest to help where you can with that.
Hope this helps you getting started. You won’t regret building this, I promise ?
Thank you so much for sharing. I am going to build one for my dewalt table saw. I saw someone just add the drawer under the table saw to collect the dust, I’m thinking to add it to this great plan. Thanks again.
You’re welcome Wen! Hope you have fun building it. If you are on Instagram I would love it if you could tag me on any updates :-). Always nice to see my plans being build by another maker :-).
Glad to see your video on building work bench/cabinet for your 7491rs as I just ordered this saw and it’s supposed to be here in a week. I also liked how you incorporated your router table into your set up. Will be giving it a go! Thanks
Hey just watched you video on you tube. I just purchased a dewalt table saw and this table looks awesome. do you have the plans for it like where the pieces go together and cuts and sizes. I know im asking for too much but im new to wood working just picked it up as a hobby about 2 months ago.
Hi Luis,
Unfortunately I don’t have such specific plans but I’m thinking about making them and asking for a small fee to buy them. Would you be interested in something like that?
Hope you enjoy your new hobby!
Kind regards,
Rico
I love your design for your table saw workbench. I would like to make one for myself. Could you please send me a link to download the plans. Thanks
Hi Rico. I love your Dewalt table saw workbench. I have just purchased a 7491 and would like to make your workbench. I was unable to get the plans from sketchup. I would love to have the sizes and plans, cut list etc if you have them.
Hi Rick, my name is Jeff and I am in Australia. I have just purchased a DW 7491 and I love your workbench. I was unable to the plans from sketchup, so if you could send me the cut list, sizes, or plans etc it would be great.
Hi Jeffrey, thanks for your message. At the bottom of the article I have a PDF available for download that contains the same information as the sketchup file. Hope that works for you. Good luck with your project!
Gr. Rico
Rico, I really like this, fit well in my small shop, but unable to get the plans, etc? Can you help?
Hi Bob, not sure what I can do to help you. The files are linked at the bottom, you can download what I made from there.
Looks like a nice, simple cart to hold the 7491 saw, Rico – Per your suggestion, can you send me the plan to build?
You didn’t add vertical corner support members – did you plan to build cabinets on the ends?
Again, great job – and thanks for the offer! look forward to building this one —
Vr,
Joe